A question to the reader (Hi, Mom)
So, this one is different: A bit of background might be useful. My foolish daughter, who I recently demonstrated was a better writer than I am (see Father’s Day Role Models ), gave me this blog about the time I retired.
That said, I’m pretty sure I’m a better woodworker than she is, since she does NOT own a table saw. Given that she lives in a NYC apartment, and by state law all NYC apartments must be the smallest living dwellings on planet earth, I can only say that I would like to see her try to own a table saw. Mind you, none of this can be interpreted to suggest that my kid would not be more competent than I am, if she were to own such a saw. After all, we did make a Dr. Who bookcase together.
So, do I actually have a question here? (Mom says no). Yes, I do. I decided for the first time to share one of my project plans with you. Like my food recipes, it lacks even the most basic of specific instructions; consider it more of a guidebook. Interpret it and change it as it suits you.
All of this yields a question: Should I put other things on this blog like this? Let me know if you’re interested.
The Bucket Game vs. Cornhole
What is Cornhole? Well, you have two big heavy platforms with a big hole. What this has to do with corn I do not know. You toss big beanbags a long way to try to get it into the hole, while counterbalancing the weight of the bean bag in one hand with a beer in the other. And you count the bags that make it through the hole (and beer cans, should you toss them.) Bear in mind, this is now a professional sport. Pretty much played by guys that look like they reside in the local bar, with a finely tuned diet of burgers and beer. Which I am not opposed to.
So, then, what is the Bucket Game? It is a platform with a few smaller holes that contain buckets so that you don’t have to lean over to pick them up. You toss smaller beanbags from whatever distance you want; we are not going to tell anyone. And you see which bean bags went into which buckets (or the potted plant nearby). Yes, this should be destined to become the next professional sport, and we are on the ground floor to success. Feel free to start sending me large amounts of untraceable cash to get in on the action.
Why is the Bucket Game better than Cornhole?
Cornhole requires 2 big heavy platforms, a sufficient distance to toss the bags (for me, two feet works). And there is really only one way to play that I know of. I suspect that most people who own these sets rarely use them outside of a party they host, because, truthfully, who wants to drag these things around?
The Bucket Game is light, is easy to store, and you can invent different ways to play. Plus, I learned that kids really enjoyed playing (as you will see).
So, how did this start?
Anyway, as some may know, I volunteer for the children’s library, both with the Friends as well as being Scary Larry the math tutor (that makes me their scary friend. I’m good with that.) The Friends of the Children’s Library raises money and buys all the stuff the kids library needs that our city refuses to pay for, like books and computers.
The way this works is as follows: Irma sends me a picture she found online and asks, “Can you make this for the Carnival?” To which I respond “Sure” because I am supposed to say that. In truth, I have absolutely no idea how to build this thing.
This is what I came up with:
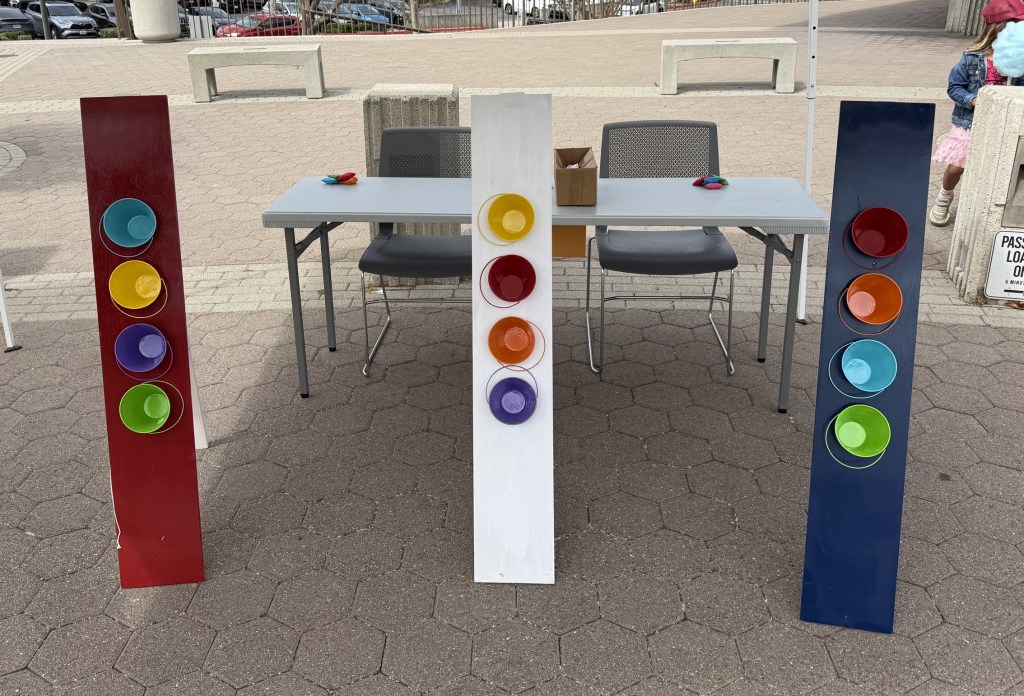
The game was used for the Summer Reading Carnival, where the staff at the library kicks off their program by having the Friends set up an old-time carnival. It turns out that this was the most popular game at the carnival, so, well, Yay!
Making this was also very simple, provided you have a few tools at home. Here are the basic steps:
- Buy stuff online (this is a federal requirement)
- Cut some wood
- Get the kids involved
- Drill the holes
- Decorate it
- Finish assembly
- Make up your own rules!
- Learn from your mistakes
Step 1. Buy Stuff Online
Now follow me here – you can’t have a bucket game without, say, buckets. Since I am not into metalcraft, I went online and paid Lex Luthor-Bezos for twelve buckets and something like twenty beanbags.
I used a 4.5” bucket (2.5 inch on the bottom) and 2.5” beanbags. You can scale them as you wish.
Step 2. Cut Some Wood
I purchased a 4’ x 2’ x ½” plywood panel at the Big Orange (they call them hobby boards, as if to point out the obvious to nincompoops like me.) I also bought two cheap 8-foot 1×3’s to use as the back legs.
I ripped the plywood into three 4’ sections each about 8” wide. Whether I used my table saw or a circular saw with a track fence I don’t know. Then I cut the 1×3’s into three 4’ boards.
Note – I needed to make 3 panels. But really you only need 2, so for the “home game” you might actually just rip the board in half, which would be more stable, and only buy one cheap 1×3 board also cut in half. Bonus – you just saved about $3!
Whew – that was an exhausting 10 minutes. I think it took longer to clean up.
Step 3. Get The Kids Involved!
Any time I can bring some of the woodwork stuff into the library when tutoring kids, I do just that. I mean, what can go wrong, right? Power tools and small children, that’s what we used to call shop class (always taught by a guy who could no longer count to 10 on his fingers.)
No, what I mean is that kids don’t realize that the math they’re learning really does have a use in their lives. So, if I can get them involved, they may actually learn something.
So, there were two steps here:
Step 3A: Get the kids to decide the height for the buckets
How do we do this? Simple- we bring in a few buckets, one of the panels and have the kids that I tutor throw things at me (Yes, it is revenge for trying to teach them math, and who can blame them?)
Empirical evidence taught me two things: First, the best heights were at 36”, stepping down 6” each bucket. The kids taught me, using subtraction, that this was 36, 30, 24, and 18 inches. I was still working off my fingers while they patiently explained subtraction to me.
The second thing I learned through experimentation is that those kids are deadly accurate when throwing beanbags at me. Motivation is the key to learning, they say.
Step 3B: Do the Math, but without numbers!
After that, the next thing for them to learn is some geometry that Tom Silva has taught me on Ask This Old House. The neat thing is that this does not require numbers.
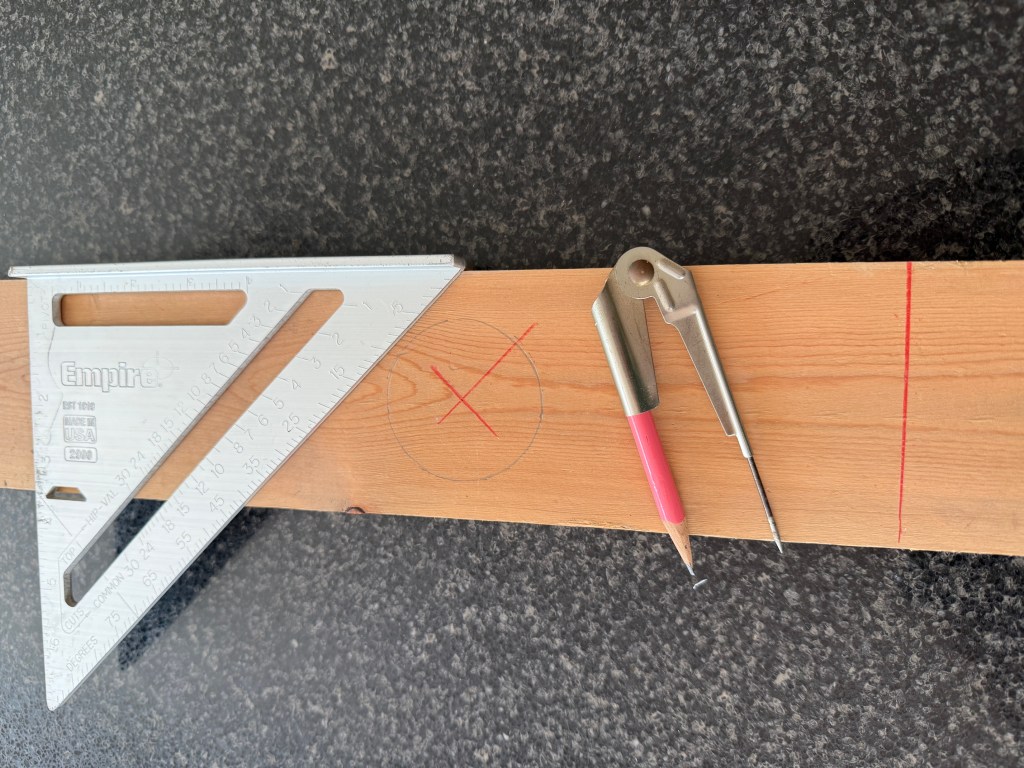
Here’s how I had the kids find the center of the board
- Using a carpenter’s square, draw a straight line across the board (see red line)
- Using the 45-degree side, draw a line through the center on one side. Flip the square and draw the opposite line. (see the red x) Where they intersect is the center of the board.
- Do this twice – once on each side of the hole, you can then draw a center line by connecting the two center points.
- Connect that with the 36” (etc.) height and you have the spot to drill the bucket hole.
- You can trace the hole with a compass to see how it lays out. Since it is a federal requirement that all kids have compasses and protractors, simply borrow theirs.
Important point: I had 4.5” buckets. I drew a 4” hole, so that the bucket would wedge into the hole on the board and sit proud of it.
Step 4. Drill The Holes
To do this, I clamped it down on my cut bench/assembly platform (this is another easy project that has been incredibly useful, if you’re interested. BTW, another Larry taught me how to make this workbench.)
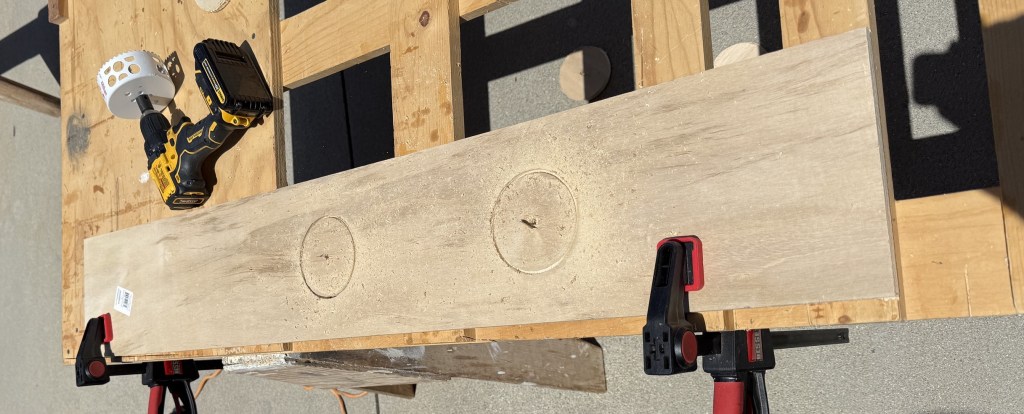
So, it ought to be easy to use a 4” hole saw and drill some holes, right? Nope – the first thing you do is wrench your wrist. I just went at it (oops), and I can tell you that this is not a good idea. I could easily have hurt my wrist. The bigger the hole saw, the more it will grab the wood and the harder you will torque your wrist is what I then learned from the “experts”.
What experts you say? Well, the kind that are on YouTube, of course. Heck, these expert carpenters proceeded to do the exact same thing, while warning you that you could get seriously hurt from the torque. Of course, I should’ve looked up Tommy (after all, I have the bobblehead), who showed me the right procedure:
- Use the starter bit to get the drill hole started, and get the hole saw to the surface.
- Slowly pulse the drill to get the hole started while holding it very lightly against the wood. If you don’t do this, the saw grabs the wood and your wrist is toast.
- Once the hole is started, you can run it a bit more smoothly, but never ever press down on the saw. It will grab at some point, so slow speed on the drill is advisable
- Once the hole is about halfway through and the starter bit has punched through flip the board around and finish the hole from the other side. Again, slowly. Reversing the board makes sure there is minimal tear out on the plywood.
Step 5. Decorate the thing.
This is simple. I sanded off any rough parts, such as the tear-out along the edges. Then I primed it and painted it with leftover spray paint I had at the house.
Now, you may want to be more crafty. For example, you might want to hire an HGTV interior decorator like Chip and Jo, who will paint it white and black. Or, as a cheaper option, you might just give the kids a brush and say, “go at it”.
Step 6. Finish the Assembly
I bought some hinges from the Big Orange – 3/4” x 2”. One attached to the 4’ arm and one to the platform, to stand it up. I then stapled string to keep the leg from bowing out.
Step 7. Make Up Your Own Rules!
First, I tried to do a soft launch with the kids I tutor. Soft? Kids? Yeah, I apparently did not learn my lesson. They launched beanbags at high velocity from all over the library. But they seemed to be having fun, so it was ready to go.
When I showed up at the carnival, the Friends asked me the obvious: “How is this game played?”
To which I honestly responded, “I have absolutely no idea. I’m only the contractor. You tell me.”
Which is the brilliant thing: There are no rules. You can make up any variety of games here. For example, score 1 at the bottom, 4 at the top and keep score.
For the carnival, where most of the kids are from pre-school to middle school, all that was necessary was for them to get the bag in the same zip code as the bucket and they win a small prize. And cheating is allowed, such as walking up and putting the bag into the bucket.
Step 8. Learn From Your Mistakes
So, I found out a few improvements that I’ll share here, for woodworking’s sake:
- Using a string was not sufficient to hold the arm. I think a chain with a couple of small screws would be better.
- These are top-heavy and, at 8” width, pretty thin. They got knocked down a lot. I’ll probably put a 12” 1×2 piece on the bottom to stabilize.
Did anyone notice these flaws? Nope. They just picked things up and kept on going.
And that was the biggest “lesson learned” for me. I watched our volunteers work with the kids – give them bags, pick them up, give them back, pick them up again, give them a prize. They all seemed to be having fun. For what it’s worth, this little “carnival” where kids do all the various low-tech games with volunteers (mostly high schoolers, which is cool in itself) seemed to be having a great time, with all of the games and activities. Best part – with no electronics involved, the kids and volunteers got to work together, something I think is missing these days.
Which is why I put this post together. I think we need more of these things and thought it would be fun to share. I’m betting that if you take the 30 or so minutes and $20 to build this game, you’ll have fun at your house with friends and kids.
BTW – did you notice that the Friends did not have me man the booth? Nope – I was in charge of food deliveries and trash pickup. They learned that lesson long, long ago…..
 LARRYLAND
Leave a comment